Hi, all!! Here are the written instructions I promised, although, my videos are better! LOL!! The links to the items used are affiliate links which means I will make a small commission at no charge to you if you make purchases through those links. CC Vintage Christmas Card Bundle: https://hsn-advocate.uqhv.net/QmLNY
Card base: 7" by 8 1/2" paper, scored and folded at 3 1/2". Card will be 3 1/2" x 8 1/2" and fit in a business sized envelope.
To make "explosion" inner: Score a piece of 6 3/4" x 8 1/2" paper at 3 3/8" and fold in half. Make a mark along the 8 1/2" spine at 4 1/4". Make two more marks at 2 inches in from either end.
Line up the middle score mark angling down to the corner point of the card and score. Do the same thing from the middle score mark to the opposite corner point. Then do the same kind of thing from the 2" marks angled toward the corresponding corner as before. (I told you the videos were better at explaining! LOL!)
Open the explosion base up and score along the longer lines created from the middle mark, score in both directions. Then mountain fold on those lines. You will have what looks like a triangle. Then valley fold on the score marks created at the 2" marks. Now you should have the "explosion" part created. Place glue on the large triangles created on top and bottom of this piece and center in the card base. Allow to dry and decorate as you wish!
Hi, guys! As promised, here are the written instructions for the moving aperture or shutter card video I released today! You know I am very much video based, so these instructions are just here as a reference...but the good stuff (clear instructions) are in the video! LOL!
If you are interested, this is the link for the Diamond Press Lots of Love stamp & die set, it is an affiliate link which means I will make a small commission if you make a purchase through it:https://hsn-advocate.uqhv.net/44vAG Of course, you can decorate your card however you wish!!
Let's go!
Take an 8 1/2 x 11 piece of cardstock and cut lengthwise at 5 1/2". Then take the 5 1/2 by 11" piece and cut at 8" (this is your gatefold card base). Take the long strip that remained from the first cut (should be 3 x 11") and cut at 6 1/2" (this creates the aperture guard piece). Use the piece left here and the little section created by your second cut and cut them both to 3 by 3 1/4". These last two pieces will create your aperture pieces.
You will have:
5 1/2 by 8" piece
3 by 6 1/2" piece
and
Two 3 by 3 1/4" pieces
Score the card base at two inches on either side, fold in on the lines to create a gatefold card base.
Score the aperture guard piece at 1/2" on each end. Fold backward on the score lines. Center a 2" circle die on this piece and cut with your die cutting machine.
Take the two small pieces that are left and score each of them at 1/2" along one edge of the 3 1/4" inch length. Stack the two pieces on top of each other matching up the score marks. On the opposite side, mark the middle of the 3" width. Using that mark as a reference, mark about 1 3/8" down on the 3 1/4" length. Holding the two pieces stacked together, make dovetail cuts from the very corner of the paper to the 1 3/8" mark.
Fold the aperture pieces on the score lines, and lightly adhere to the gatefold flaps. Center the aperture guard over the two aperture pieces and lightly adhere to the card. Close the card and give the whole thing a good bone folding!! Decorate as you wish!
Hi, all! I just wanted to post some still pictures of the mandala card I created using Spellbinders' small die of the month for August! So fun, easy, and addicting!! Links to the die set will be affiliate links which means I will make a small commission if you use them to purchase any items. Thank you!!
This came together so well!! Thanks for stopping by to take a closer look at the images using Art Impressions' Southwest stamp set and their super easy to use 3D frame dies! Links included will be affiliate links, meaning if you make any purchases using those links I will make a small commission. Thank you for the support!
Hi, guys! Here are the swatches of the order I put the pencils in...needs a little tweaking but it might help you get yours in order better! Any links I have for the Arteza products will be affiliate links, meaning I will make a small commission if you make any purchases using those links. Thank you!
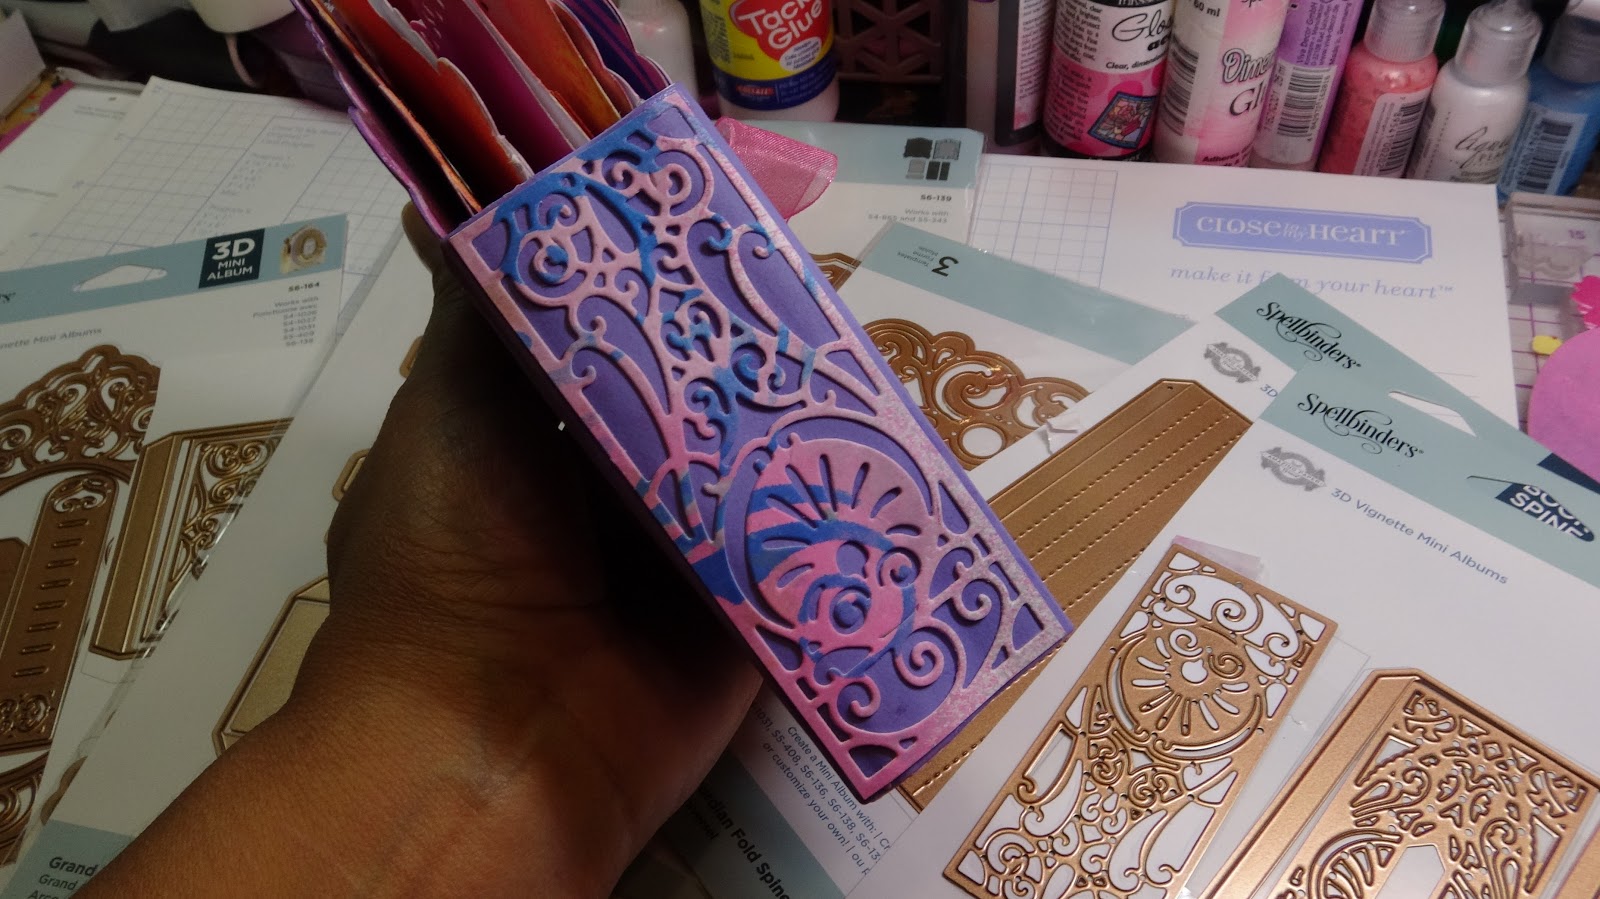
I love the way this came out. Today's video shows how to make an artsy mini using the Becca Feeken Crested Tower dies. It seems most projects using those are very elegant and I wanted to go a more playful way! There are affiliate links listed after the images, this means I will make a small commission if you make any purchases using those links. Thank you!
I decided to begin a new series called "Free Form Friday." I will use the time to do fun, free flowing, techniques...at least I hope to! I have included some still images and some pertinent affiliate links. I will receive a small commission should you chose to make any purchases using those links. Thank you!
Today's Bust it Out included playing a bit with whatever art crayons you may have. I have included affiliate links here for some of the ones I used. I will make a small commission on these items if you choose to purchase them using those links.
I had a lot of fun just using a little water, a blending tool, and these fun little guys! I did make some really quick flowers using the Tim Holtz Small Tattered Florals. It was so great getting back to making gorgeous (and easy) flowers. (:
Today's video was so much fun to make. I love the way the cards came out. The link to the Super Chill kit is an affiliate link, which means that I will receive a small commission if you choose to purchase any items using those links. https://shrsl.com/2bnlz
As always, I will refer you to the video tutorial for specifics and post here to provide still pics! Thank you all so much! I hope you enjoyed watching!!
Hello, all! I hope you are all well! I thoroughly enjoyed reviewing Diamond Press' new Tropical Foliage dies kit. The kit was sent to me free of charge by Diamond Press. All opinions are my own.
I just wanted to follow up on my latest YouTube tutorial with a blog post. I wanted to put a couple still images out there for the Snarky Cat card I just made. Adorable! I am thinking about drawing a quick sketch of a coffee mug in his little hand...that's if I can't find my "accessories" stamps for the other cat sets!
Links for many of the products use will be listed after the images. Some are affiliate links.
Hey, everyone! My intention was to write up the joining instructions, but I don't think I am up to it!! The video explains much more. However, begin with your top corner square...do a 7th round with your square joining color. For me, that is Black. Do a complete round and fasten off. Then get the next block, slip stitch the joining color yarn in a granny corner. Complete the granny corner in that same corner, work across two sides. When approaching the second side's end corner, only make half of the corner and a chain 1, then connect into the corner of the previously completed granny square as in the video. Then continue working that side...doing 3 double crochet clusters attached to the opposite granny square, etc...
I am sorry, it is not easy for me to write these types of instructions...that's why I make videos!! LOL! Please watch the video to complete! TY!!
Hello, all! I hope you guys choose to try and make a quick & easy blanket along with me! Granny squares are classic and so easy. You can make them in any size, color, and method you prefer. This is the way I do it, but you can follow any granny square tutorial and get the same results, I promise!
You will need 7 different colors of worsted weight yarn. I am using Michaels Loops & Threads "Impeccable" yarn in Royal, Grape Punch, Kelly Green, Sunny Day, Orange Crush, Red Hot, and a basic black for joining the squares. I am using an I Hook to make a looser stitch. The yarn normally asks for an H or an I.
We will make 12 granny squares of one color sequence, and 13 of the opposite color sequence. In my case, I went rainbow order with red beginning the "rounds." Then in the second set of squares, purple began the "rounds."
Method for granny squares:
Round 1: With first color chain 5, slip stitch into first chain to close loop (or use a magic circle). Chain three, 2 double crochet into loop (magic circle). *Chain 2, 3 double crochet into loop (magic circle).* Repeat * to * two times more. Chain 2 then slip stitch into top of beginning chain 3. Fasten off.
Round 2: Slip stitch second color into a chain 2 space. Chain 3, 2 Double crochet, chain 2, 3 double crochet into same chain 2 space. *Chain 1, 3 double crochet, chain 2, 3 double crochet into next chain 2 space.* Repeat * to * two times more. Chain 1, then slip stitch into top of beginning chain 3. Fasten off.
Round 3: Slip stitch third color into a chain 2 space. Chain 3, 2 Double crochet, chain 2, 3 double crochet into same chain 2 space. *Chain 1, 3 double crochet in next chain 1 space, chain 1, 3 double crochet, chain 2, 3 double crochet into next chain 2 space.* Repeat * to * two times more. Chain 1, 3 double crochet into next chain 1 space, then slip stitch into top of beginning chain 3. Fasten off.
Round 4: Slip stitch fourth color into a chain 2 space. Chain 3, 2 Double crochet, chain 2, 3 double crochet into same chain 2 space. *Chain 1, 3 double crochet in next chain 1 space. Chain 1, 3 double crochet in next chain 1 space, chain 1, 3 double crochet, chain 2, 3 double crochet into next chain 2 space.* Repeat * to * two times more. Chain 1, 3 double crochet into next chain 1 space. Chain 1, 3 double crochet in next chain 1 space then slip stitch into top of beginning chain 3. Fasten off.
Rounds 5 & 6 will continue in the same pattern using the fifth and sixth colors (3 dc in chain 1 spaces and 3 dc, ch 2, 3 dc in chain 2 spaces)!
Again, you need 12 granny squares in one color sequence and 13 in the opposite color sequence. They are stitched up exactly the same just different color sequences.
Stay tuned for the next post to JAYG (join as you go) with the black yarn (or whatever color you would like).
This is going to be fun, and I pray you are all well.
Hello, all! Here is the tutorial for this sweet mug cozy. Of course, it can be made in millions of color ways, this one has a bit of a holiday feel...if you look really close!
You just need some cotton fabric (a backing piece cut at 12 1/2" x 3 1/2" and several other pieces for front of mug), thin batting or fusible fleece (12 1/2" x 3 1/2"), a button, hair tie or stretch cording, the heart pattern available here: https://wombatquilts.com/2015/02/02/a-heartfelt-paper-piecing-monday/ and a sewing machine.
Here are the images I recently mentioned in a YouTube video. The images are provided so you can make a bank easily...the tabs created around the panels will snap together very easily and make a sturdy box/cube/bank. The basic pattern area of the panels are 14x16 perler beads and the tops are 14 beads square. I then added pink borders all around, making the side panels 16x18 and the top/bottom 16 beads square. Lastly, I added the black beads for the "snap" together. Have fun!!